Just a quick heads up: All of my Angular blogging now happens at Angular Training. Angular Training is, well, my Angular training and consulting business 🙂

Just a quick heads up: All of my Angular blogging now happens at Angular Training. Angular Training is, well, my Angular training and consulting business 🙂
When I first started working with Angular (back when it was known as Angular 2 beta), I had a hard time getting my head around the lengthy set-up process. After all, all Angular JS required was a single Javascript file, and now I had to download hundreds of megabytes of dependencies, install a compiler, use Node JS and npm, etc.
It was definitely not fun nor easy. Plus that process would change fairly often as Angular would first favor System JS, then Webpack.
Luckily enough for all of us Angular developers, the Angular team listened to our feedback and started working on Angular CLI, a tool to initialize, develop, scaffold and maintain Angular applications.
The lengthy process finally became much easier:

Four simple commands and now you not only have Angular installed, you also get:
The above alone sounds awesome and that’s not it. Angular CLI has a ng generate command that allows you to generate components, pipes, modules, directives , services, classes, etc. When you create a new component using CLI, it generates a sample component for you (with the class name and all of the regular imports that you need) and adds that component to your app module definition.
Oh, and it also generates a sample test specification that you could run later on using… ng test! Functional tests with Protractor are also covered with a specific option: ng e2e.
Angular CLI also helps follow the best practices recommended by the Angular team in terms of folder structure, file names and other coding conventions. Instead of reading the entire style guide, you can just use Angular CLI and follow the best practices by default, which is way easier.
Finally, Angular CLI also helps with your production build or any other kind of build for your different environments (QA, test, dev, etc.). There is a ng build command that you can customize to build for a specific environment, for instance: ng build –env=prod.
As a result, I strongly recommend using Angular CLI. It brings so many features to the table that it would be really difficult to write Angular code without using it. I don’t think I would ever use Angular without the CLI!
Angular 4 was released last week, following the new schedule set by the Angular team that decided to release one new major version every 6 months.
Wait, where is Angular 3?
There won’t be any Angular 3. That’s because the Angular Router package was already at version 3.x, while all other Angular packages were at version 2.x. The Angular team decided to jump to version 4.0 for all those packages so that they are back in sync from a versioning perspective.
Is Angular 4 another full rewrite of the framework?
No, quite the opposite actually. Angular 4 is really an Angular 2++. The versioning strategy changed but the code is not different at all. If you know how to work with Angular 2, then you already know Angular 4.
So what’s new then?
In a nutshell, Angular is smaller and faster. many improvements have been made under the hood to make sure that your code compiles down to something that is more efficient and less verbose.
In most cases, code generated with the AOT option is 60% smaller than before, which is a huge improvement.
The animations were moved from @angular/core to their own package so that if you don’ t use animations, your app code can get even smaller.
From a code perspective, the only real difference you can experience is the addition of “else” conditions to ng-if as well as some other syntax improvements summarized in this snippet:
<div *ngIf="userList | async as users; else loading">
  <user-profile *ngFor="let user of users; count as count" [user]="user">
  </user-profile>
  <div>{{count}} total users</div>
</div>
<ng-template #loading>Loading...</ng-template>
Everything else remains unchanged so no painful migration ahead!
Another major update is that Angular 4 works with TypeScript 2.1 and 2.2, which is also an intresting update to get more out of TypeScript as well.
For a full list of what’ s new in Angular 4, don’t hesitate to take a look at the release post on the official blog.
One of the questions I hear the most often when I teach Angular is: How do I implement authentication? There are a lot of options out there so I’ll stick with the tools Angular provides out of the box, which allow to implement authentication without any external dependency.
First, I’m assuming that you’re familiar with the Component Router. In a nutshell, the router decides which component to display based on the current URL, thus emulating multi-page behavior in Angular (which is a single-page application framework).
It’s easy to guess that the router will be involved in all-things authentication. By default, configuring a route in the router looks like this:

Now if I want to protect the above route, I can use a guard to do that. The route declaration then becomes:

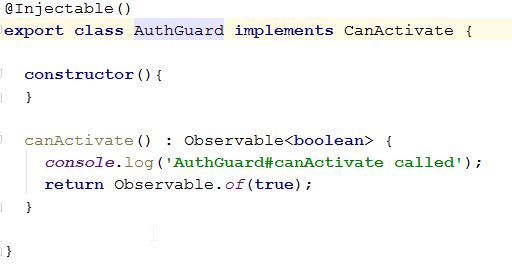
In the above code, AuthGuard is a class that implements the CanActivate interface, which consists of a single canActivate method that returns an Observable. Below is what a basic guard looks like – it has to be an Angular service – note that this one doesn’t do much as it would basically let all requests go through since it always returns true:
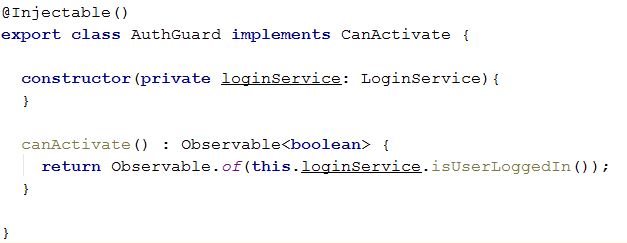
In order for that guard to be useful, it would have to use a LoginService that would tell whether the current user is logged in or not. That’s where the implementation becomes specific to your application as that service will depend on how your back-end wants to authenticate the user. The guard code then becomes:
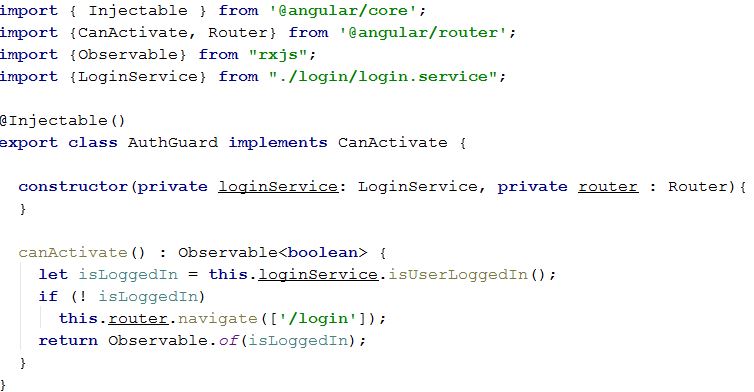
Note that you can also use the guard to redirect the user to a LoginComponent whenever the user has to log in. Here is the full code of such a guard:
You now know the basics of how to implement authentication with Angular. The specifics of what the LoginService would do depends on your back-end, though it is very likely that you will have to make a request to your authentication server and get some kind of token or session object as a result.
With Angular 4 around the corner, now is a great time to migrate to Angular 2. There is no rush though as Angular 4 is just the next iteration of what is now called Angular, the new name for v2, 4, 5,6 and so forth. As a result, per the latest branding guidelines, this article should really be titled How to migrate from Angular JS to Angular?
1) Migrate to the latest version of Angular JS
As of right now, the latest version of Angular JS is 1.6. You should really consider upgrading because Angular JS 1.5+ has introduced features that are similar to what Angular now uses (components being the most important one). The main goal for 1.5 and 1.6 was to make the migration to Angular easier, so that’s the first step to take. The migration guide for all 1.x versions can be found here.
2) Get your 1.x code ready for Angular
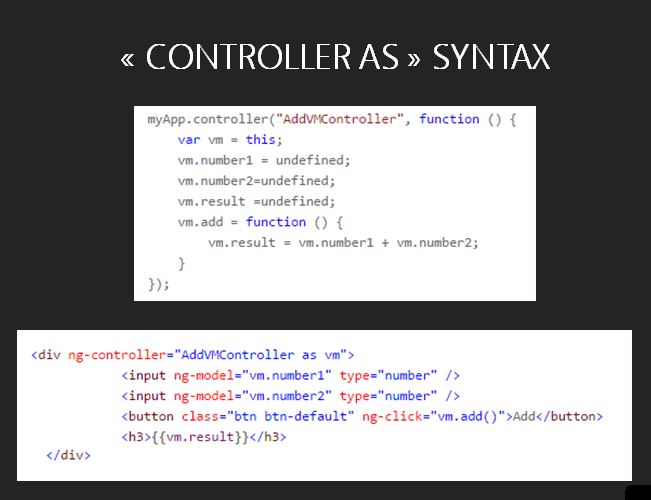
First, remove $scope from your code and use the “controller as” syntax instead. Since Angular uses TypeScript classes, getting rid of $scope and using a syntax that is much closer to actual class properties makes perfect sense. Here is an example of a controller + HTML template that use the “controller As” syntax:
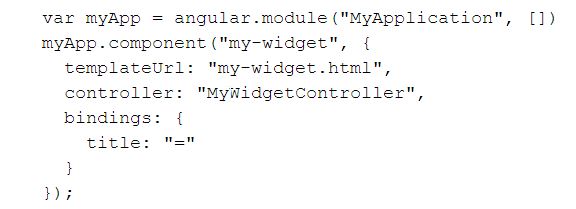
Then it would be a good idea to replace your controllers / directives with components, introduced in Angular 1.5. A component is a directive with a HTML template. Here is what a simple Angular 1.x component looks like – A directive with a HTML template:
The final step is to start learning and using TypeScript in your code. Since TypeScript transpiles down to ES5 code, you can already use TypeScript for development purposes and then deploy the resulting Javascript to production.
3) Upgrade incrementally to Angular
Angular has an upgrade adapter that allows you to mix and match Angulaar JS and Angular in the same app:

The next step is to use the upgrade adapter to migrate your code piece by piece. I would suggest to first upgrade your services, then directives / components. The reason for this is that services are not very different in Angular compared to what they were in Angular JS.
Finally, use the Angular component router and bootstrap your app with Angular.
4) Enjoy and relax!
Seems like an easy process? Not quite, right? That’s why I would only consider upgrading apps if a full rewrite is not an option. In most cases, it’s actually easier to build a new Angular project with CLI and create components / services inspired from your old Angular JS code.
It’s a great opportunity to only keep what you need and to learn Angular in the process as well.
As crazy as it sounds, Angular 4 is going to be released in March of 2017. There won’t be any Angular 3, and Angular will jump from version 2 to 4 just like that. If you want to learn the reason why, the full story is here.
In a nutshell, there won’t be any Angular 3 because the router module is already at version 3, and the Angular team wants to increase all modules to v4 so that they are in sync from a numbering perspective (right now, Angular 2.x is using the 3.x router, which is confusing).
No worries though: Angular 4 is really going to be Angular 2 with a bunch of breaking changes, but nothing like the scary migration from Angular 1 to Angular 2. By the way, Angular is the new name for Angular JS, and it is recommended to drop “Angular 2” as well.
Angular is a framework that will now increase its major version every 6 months, which is the only time when there will be some breaking changes. All other upgrades (2.1 to 2.2, 2.2 to 2.2.4, etc.) are 100% safe from breaking changes.
As a result, Angular 5 will be released by the end of 2017, and Angular 6 during spring of 2018. Because of that, now is a perfect time to migrate from Angular 1.x to Angular 2, so that you can easily catch the train of the next releases from now on and switch to Angular 4 in a few months:
In order to assist with that, I just released a second edition of my video course “Migrating to Angular 2“. It is updated with the latest changes in Angular 2 and features an additional video about TypeScript and Angular Components as well.
For a short amount of time, it is on sale at only $5 instead of $79 (yep, my editor is crazy!) so don’t hesitate to catch it while the price is at an all-time low for the Holidays.
The long wait is finally over, Angular 2.0.0 is now released! It took 7 release candidate versions started with RC1 four months ago to get there.

I will do my best to find some time to publish some more tutorials very soon. Right now I’m working on class materials for my own Angular 2 training sessions.
HTML forms have been around for a while, yet validation of user input solely using HTML and Javascript is still a painful task to tackle. Angular 2 has some nice features that make form management very easy and pretty much painless. This post will focus mostly on template-driven forms, which are the least verbose option offered by Angular 2.
Template-driven forms are my favorite option because most of the magic happens in the HTML template, which means that very little Typescript code has to be written. Here is the form we’re going to work with:
<form> <label>Firstname:</label> <input name="firstname" required="" type="text" /> <label>Lastname:</label> <input name="lastname" type="text" /> <label>Street:</label> <input name="street" type="text" /> <label>Zip:</label> <input name="zip" type="text" /> <label>City:</label> <input name="city" type="text" /> <button type="submit">Submit</button> </form>
This is just a regular form, nothing fancy in here. What I want to do is have Angular 2 handle the submission of that form. In order to do that, I need to add the following code:
<form #form="ngForm" (ngSubmit)="logForm(form.value)" >
This does two things:
form, which has some magic powers. One of them is to hold the value of our form as a Javascript object, which can be accessed with form.valuelogForm() method will be called on my component, with the current value of the form as a parameter.By the way, you may wonder what my component looks like. There it is:
import { Component } from '@angular/core';

@Component({
  moduleId: module.id,
  selector: 'app-forms',
  templateUrl: 'forms.component.html',
  styleUrls: ['forms.component.css']
})
export class FormsComponent {

  logForm(value) {
    console.log(value);
  }
}
Pretty much an empty component. Its template is the HTML I introduced earlier. Now in order to make this work, we have to import some dependencies in our ngModule. Form specific code is highlighted below:
import { NgModule }      from '@angular/core';
import { BrowserModule } from '@angular/platform-browser';
import { FormsModule }   from '@angular/forms';
import { FormsComponent }  from './forms.component';

@NgModule({
  imports: [
    BrowserModule,
    FormsModule
  ],
  declarations: [ FormsComponent ],
  bootstrap: [ FormsComponent ]
})
export class AppModule { }
Almost there! All we need now is to tell Angular which form elements we want to be bound to our form model. This is achieved using the ngModel directive as follows:
<input type="text" name="firstname" ngModel required>
<br/>
<label>Lastname:</label>
<input type="text" name="lastname" ngModel>
<br/>
Now if I fill out that form and hit the submit button, Angular 2 will call the logForm() method, which will basically output our form model to the browser console:
{firstname: "Alain", lastname: "Chautard"}
That was easy, right? We just added a couple of directives to our HTML and we have an object that we could send to our server using AJAX.
My form already has a required attribute in place. If we try to submit the form with no first name information, it won’t be submitted and the browser will display a message to highlight the required field.
This is a great feature, yet it relies on browser specific implementations as it’s based on the HTML5 specification. Let’s see how to define our own custom error handling. First we tell the browser that we don’t want its default HTML5 behavior:
<form #form="ngForm" (ngSubmit)="logForm(form.value)" novalidate >
Then we add the following definitions to our CSS file:
.ng-valid[required] {
  border-left: 5px solid #42A948; /* green */
}

.ng-invalid {
  border-left: 5px solid #a94442; /* red */
}
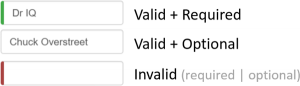
And… that’s it! Angular 2 automatically adds and removes CSS classes to each form element based on its validity. No Typescript code has to be written to achieve this. As a result, my form will now be styled as follows depending on the data entered:
Let’s do more than CSS styling. Let’s say that we have a zip code field that is required, should be exactly 5 digits long, and that an error message will show up to help the user enter valid information. The following code will do exactly that:
<input type="text" name="zip" #zip="ngModel" required pattern="[0-9]{5}">
<div class="alert" [hidden]="zip.valid || zip.pristine">
  Please enter a 5-digit zipcode
</div>
Let’s take a look at the above code. First, we create a local variable using the #zip syntax. zip will give us access to form state attributes similar to the CSS classes that Angular 2 deals with.
Then we define a 5-digit pattern, which is regular HTML5 code, nothing Angularish here. Finally, we add a div that will be hidden if zip.valid is true or if zip.pristine is true. That way the error message will show up only if the user enters wrong information, and will be hidden as long as the text input is pristine, which means the user hasn’t typed anything yet.
As you can see, customizing our forms with validation and error messages is a fairly easy thing to do in Angular 2. The best part of it is that everything is achieved through HTML attributes, which means less Typescript code to write and to maintain.
Angular 2 RC5 released the final version the forms API, which means you can safely start using forms without fearing that next releases will have a different implementation.
Angular 2 RC5 was released a couple days ago. This RC5 version brings Angular 2 one step closer to its final release, as the Angular team stated in its announcement:
“RC5 represents our expected public API for our 2.0.0 release, including router and forms APIs”
That’s great news as it basically means that 2.0.0 is closer than ever. It also means that if there’s a RC6 in the future, it should not have any breaking changes.
Let’s take a quick look at what’s new in RC5:
NgModule does not sound that exciting but it is! It’s a new decorator that looks like this:
import { NgModule }       from '@angular/core';
import { BrowserModule  } from '@angular/platform-browser';
import { AppComponent }   from './app.component';

@NgModule({
    declarations: [AppComponent],
    imports:      [BrowserModule, RouterModule],
    bootstrap:    [AppComponent],
})
export class AppModule {}
If you’re not excited yet, I can understand that. Now if you’re written a little bit of Angular 2 code before RC5, you know that you had to list all of your dependencies with import statements and directive attributes in your components as follows:
import { Component } from '@angular/core';
import { HelloWorld2 } from './helloWorld2.component';

@Component({
  moduleId: module.id,
  selector: 'app-communication2',
  directives: [HelloWorld2],
  pipes: [ MyMagicPipe ]
  template: `<hello-world2 [message]="myMessage" (onClick)="myCallback($event)"></hello-world2>`

})
With NgModule, all of the repetitive boilerplate code used by most of your components / pipes/ services can be listed once for all in your NgModule declaration. Once you’ve done that, you can get rid of the directives declaration in your components (and you should – it will be removed from Angular 2.0.0 thus becoming a breaking change at that point).
NgModule is also the decorator we will now use to specify which component is the root component to bootstrap. A nice addition to Angular 2!
The Angular team already created a bunch of commonly used modules with NgModule so that we can import them easily. Another nice syntax shortcut added to Angular RC5.
60% of Angular 2’s code size is the compiler. With Ahead-of-time compilation (AoT), Angular 2 can now be used without compiling your components / templates on the fly.
As a result, users should be able to see decreased start-up time for your app as the compilation work will laready be done when the page is loaded.
Also, we can expect the Angular 2 “runtime” dependency to be 60% smaller as a result, which would result in a faster download as well.
Lazy-loading is another option to make things happen faster, as you can now specify lazy pahts in the router that will load specific modules only when requested by the user:
@NgModule({
  declarations: [ MyComponent, MyHomeRoute ],
  bootstrap: [ MyComponent ],
  imports: [
    RouterModule.forRoot([
      { path: ‘home’, component: MyHomeRoute },
      { path: ‘lazy’, loadChildren: ‘./my-lazy-module’ }
    ])
})
class MyAppModule {}
All in all, no revolution with Angular 2 RC5, yet some good news that allow us to believe that the final release is getting closer and closer!
Angular 2 got its two first release candidates this week. This happened exactly while I was giving a training session in San Diego to the Verizon Networkfleet team. At least this helped me convey the message that Angular development is an ever changing world where things can be different from one week to the next.
Now that Angular 2 is (almost) live, don’t hesitate to get in touch if you need some training. I’d be happy to help you and your team get up to speed with Angular 2.